
Hot Issues
1. Unmountable_ Boot_ volume error in WindowsXP Pro/Home
2. Front Panel Mic not Working in Acer Veriton 7500
3. Disable startup applications in Windows 2000/NT
4. CDR/CDRW drive not detected in the OS but detected in the BIOS.
5. Enabling hidden items in Windows setup of Add Remove Programs in windows2000/XP
6. Save/Restore of RAID configuration of LSI Mega RAID controller
7. HP XE320 not booting, continues beep music
8. Speedup the Start menu in Windows XP
9. Speeding up network browsing in Windows 2000
10. Increase Windows XP performance and save disk space.
11. Boost your Internet connection speed in Windows XP
12. What's new in Microsoft Windows Server 2003 ?
13. Acer Veriton 7600G , Audio Line-out does not work from the rearside connector
14. To increase the internet browsing performance - disable the windows XP default firewall
1. Unmountable_ Boot _volume in WindowsXP Pro/Home
|
|||||||||||||||
|
2. Front Panel Mic not Working in Acer Veriton 7500
PROBLEM : In Acer veriton 7500 Recording not happening from front Panel .
OS : Windows XP
RESOLUTION :
a. Right click on the sound controller icon on your taskbar.
b. Select OPEN VOLUME CONTROLS .
c. Select Options Menu & Select Properties.
d. Select ' Others 'From Adjust volume for.
e. Select Alternate Mic / Mic2, click on OK button
f. Close Volume contols window, & check your Mic recording.
Article Contributor : M.S.Mahadev. Index

3. Disable startup applications in Windows 2000/NT
Disabling startup programs within Windows 2000 isn't nearly as simple as it is in Windows 9x/Me, where you can manage that task from within the System Information program. The only way to disable startup items that aren't in your Startup folder is to open up Regedit and browse to [HKEY_LOCAL_MACHINE\SOFTWARE\MICROSOFT\WINDOWS\CURRENTVERSION\RUN or HKEY_CURRENT_USER\SOFTWARE\MICROSOFT\WINDOWS\CURRENTVERSION\RUN]. From there, you can manually delete the values, which are starting the unwanted applications. We would recommend that you export the values that you intend to delete, however, just in case you make an error.
Article Contributor : M.S.Mahadev. Index
4. CDR/CDRW drive not detected in the OS but detected in the BIOS.
OS: Windows 9x/2000/XP.
Description: In the device manager the driver for the respective drive has a yellow exclamation mark. Even if the driver is deleted from the device manager and the system is restarted the problem will not be resolved. We have two registry keys that needs to be deleted.
Solution:
a. Click on the START --> RUN. Type regedit and click OK.
b. Follow the path [HKEY_LOCAL_MACHINE\SYSTEM\CURRENTCONTROLSET\CONTROL\CLASS\
4D36E965-E325-11CE-BFC1-08002BE10318.
When you click on the above folder and highlight it you can see the subkeys on the right side.
The keys that you need to delete are Upperfilter and Lowerfilter. Once you have deleted the keys restart the machine. This will fix the issue.
Article Contributor : Saumil Timbadia Index
5. Enabling hidden items in Windows setup of Add Remove Programs in windows2000/XP
[1]. Open the Windows Explorer.
[2]. Go to Tools->Folder Options->View->(Select show hidden files and folders)
[3]. Open to C:\Winnt\inf\sysoc.inf (Where 'inf' is an hidden folder in winnt)
[4]. The sysoc.inf file will be as follows:
[Version]
Signature = "$Windows NT$"
DriverVer=07/18/2002,5.00.2195.5438
[Components]
NtComponents=ntoc.dll,NtOcSetupProc,,4
Display=desk.cpl,DisplayOcSetupProc,,6
Fax=faxocm.dll,FaxOcmSetupProc,faxsetup.inf,hide,7
NetOC=netoc.dll,NetOcSetupProc,netoc.inf,,7
iis=iis.dll,OcEntry,iis.inf,,7
com=comsetup.dll,OcEntry,comnt5.inf,hide,7
dtc=comsetup.dll,OcEntry,dtcnt5.inf,hide,7
IndexSrv_System = setupqry.dll,IndexSrv,setupqry.inf,,7
msmq=msmqocm.dll,MsmqOcm,msmqocm.inf,,6
ims=imsinsnt.dll,OcEntry,ims.inf,,7
fp_extensions=fp40ext.dll,FrontPage4Extensions,fp40ext.inf,,7
iisdbg=iisdbg.dll,ScrptDbg,iisdbg.inf,,7
imagevue=ockodak.dll,ImagingOcEntry,imagevue.inf,hide,7
AutoUpdate=ocgen.dll,OcEntry,au.inf,hide,7
IEAccess=ocgen.dll,OcEntry,ieaccess.inf,,7
OEAccess=ocgen.dll,OcEntry,oeaccess.inf,,7
WMPOCM=ocgen.dll,OcEntry,wmpocm.inf,,7
Games=ocgen.dll,OcEntry,games.inf,,7
AccessUtil=ocgen.dll,OcEntry,accessor.inf,,7
CommApps=ocgen.dll,OcEntry,communic.inf,,7
media_clips=ocgen.dll,OcEntry,mmopt.inf,,7
MultiM=ocgen.dll,OcEntry,multimed.inf,,7
AccessOpt=ocgen.dll,OcEntry,optional.inf,,7
Pinball=ocgen.dll,OcEntry,pinball.inf,,7
MSWordPad=ocgen.dll,OcEntry,wordpad.inf,,7
[Global]
WindowTitle=%WindowTitle%
WindowTitle.StandAlone=%WindowTitle_Standalone%
[Strings]
WindowTitle=Windows 2000 Professional Setup
WindowTitle_Standalone=Windows Components Wizard
[5]. To unhide the items in Windows Setup of Add Remove Programs,
just remove the word 'hide' from the above file and save it.
[6]. Now open Control Panel -> Add Remove Programs -> Windows Setup
All the hidden attributes will be visible for change.
Article Contributor : Krishna Prasad Acharya
Index
6. Save/Restore of RAID configaration of LSI Mega RAID controller
RELEASE DATE: November 2002
O
This document shows you how to save/restore RAID
configuration of LSI Logic MegaRAID controller from the software utility, Power
Console Plus.
Products Affected
LSI Logic
MegaRAID controllers, including Express 500, Elite 1600 and Enterprise 1600.
SOLUTIONS
LSI doesn’t provide the Save/Restore RAID
configuration feature at BIOS level (i.e., MegaRAID BIOS Configuration Utility).
Instead, you have to do that with the Power Console Plus running in Windows
2000/NT environment.
Power Console Plus Installation
First of all, you need to install the Power Console
Plus. This is the RAID management software utility bundled with the MegaRAID
controllers. You could find this software in the software CD:
\Power Console Plus\extracted
Please run the SETUP.EXE to install the software.
After the installation, you need to restart the server.
NOTE. This software can be installed on Windows
2000/NT.
NOTE. During the installation, please select the
following software components:
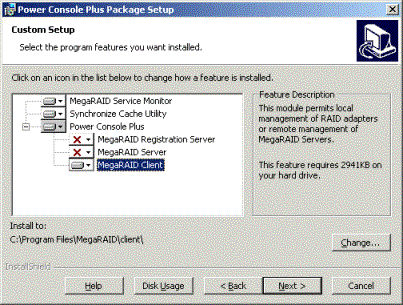
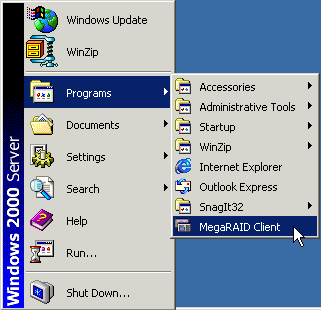
After the server is restarted, you could launch the
Power Console Plus software utility:
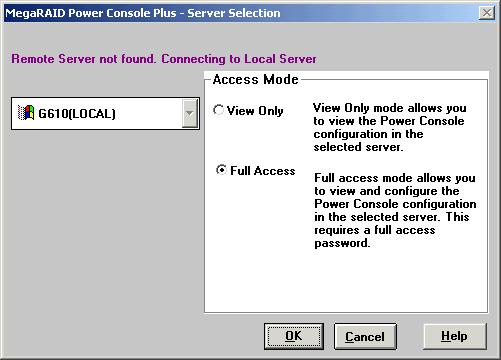
NOTE. To Save/Restore the RAID configuration, you
have to select Full Access when you launch the Power Console Plus.
Now, you can select Configuration from the menu.
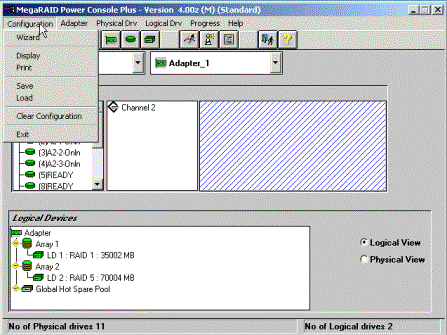
To save configuration, please select Save. To
restore configuration, please select Load.
Sometimes, you might want to restore a configuration
that includes an OS drive. In this case, you have to restore the RAID
configuration before you install the OS. For example, one Altos G610 is
installed five hard drives. Two of them, as RAID 1 volume, are installed with
OS. The other three drives, as RAID 5 volume, are reserved for application data.
In this example, you could install the RAID
controller on another server, for example, G500 or something else, which is
already installed with Windows 2000 (on the onboard SCSI). Then, you just simply
install the RAID driver and Power Console Plus utility. (You don’t need to
connect any HDD on this RAID controller.)
Then, you can run Power Console Plus to restore the
configuration. After the restore, please shutdown the server (G500). Then move
this RAID controller to the server (G610) that you plan to restore. Please also
properly connect the hard drives to the RAID controller.
Now, please turn on the server (G610). You could see
the following warning message:
LSI
MegaRAID 40-LD BIOS
Ver 3.13 Jan 11, 2001
Copyright(c) LSI Logic Corp.
HA –0 (Bus 3 Dev 0) MegaRAID Elite 1600
Standard
FW C170 DRAM=64MB (SDRAM)
2 Logical Drives Found on the Host Adapter
2 Logical Drive(s) handled by BIOS
Configuration of NVRAM and drives mismatch(Normal
mismatch)
Run View/Add Configuration option of Config Utility
Press <Ctrl><H> for WebBIOS Or
Press A key to Run Configuration Utility or <Alt><F10> to Continue
Then, you could press any key to run MegaRAID BIOS
Configuration Utility and select View/Add Configuration,
Configure -> View/Add Configuration -> View
NVRAM Configuration
Then, save the configuration and exit the
configuration utility. You won’t see this message next time when you boot the
server.
NOTICE:
The information in this document, including products and software versions, is current as of the Release Date above. This document is subject to change without notice.
Article Contributor : acer Index
Description: If your HP XE320 system not booting, no display, continuous beep music. You are in a right place.
Solution : Open the front panel cover and remove the POWER ON switch clean the switch properly with cleaning solutions ( IP ) and fix back switch and front panel, POWER ON the system.
Article Contributor : Sudheendra chadaga Index
8. Speedup the Start menu in Windows XP
The Start menu takes quite a while to display the list of programs installed.
In order to get Windows XP to display the list faster, you will have to edit the
registry settings. To speed up your Start menu, go to Start > Run and type
regedit. This will open the registry window. Then navigate to the following key:
HKEY_CURRENT_USER\Control Panel\Desktop. Scroll down in the right panel and
double-click on 'menushowdelay'. In the Value Data box, change the default value
for the menu speed from 400 to a lesser number, such as 1 or even 0. Click OK.
You should now find a significant increase in the Start menu speed.
Note: Remember to back up your registry before making any changes
Article Contributor : M.S.Mahadev Index
9. Speeding up network browsing in Windows 2000
A bug in Windows 2000, causes the scheduled tasks folder to be searched,
whenever the user browses network drives. While Microsoft has developed a fix
for this bug, the fix slows down the browsing of Microsoft networks. In order to
fix this problem, go to Start > Run,
type in regedit and press [Enter]. Navigate to HKEY_LOCAL_MACHINE/Software/Microsoft/Windows/Current
Version/Explorer/RemoteComputer/NameSpace. Then find a key named
{D6277990-4C6A-11CF-8D87-00AA0060F5BF}. Right-click on it and delete it. Restart
the computer. Now you will be able to browse the network a lot faster.
Article Contributor : M.S.Mahadev Index
10. Increase Windows XP performance and save disk space.
There are certain services, such as Windows Update and System Restore, which
load automatically and occupy a lot of space. If you want to disable them, right
click on My Computer and choose Properties. Click on the System Restore tab and
check the box 'Turn off System Restore'. This will increase Windows performance
and save disk space.
Just next to the 'System Restore' option, you will find the 'Automatic Update'
option. This option will periodically ask you to update the OS. You can go ahead
and disable this, but remember that you will have to update Windows manually
after applying this option, and there will be no further reminders.
Article Contributor : M.S.Mahadev Index
11. Boost your Internet connection speed in Windows XP
Some of us may find that after installing Windows XP, the Internet connection gets slower. A possible reason for this is the QoS (Quality of Service) installed. This service reserves 20 per cent of the bandwidth for itself, even with QoS disabled. In order to remove this reserved quota, you will have to make sure you are logged on as Administrator. Go to Start > Run and type gpedit.msc. Expand the 'local computer policy' branch, the 'administrative templates' branch, and the 'network' branch. Highlight the 'QoS Packet Scheduler' in the left window. In the right window, double-click the 'limit reservable bandwidth' setting. Then, on the Setting tab, check 'enabled', and change the 'Bandwidth limit %' to read 0. After doing this, you should immediately notice a boost in your Internet connection speed.
Article Contributor : M.S.Mahadev Index
13. Acer Veriton 7600G , Audio Line-out does not work from the rearside connector
Problem:In Acer Veriton 7600G Desktops, Audio
Line-out does not work from the rear side connector in Backpanel. However, the
Audio is OK, if connected to the Desktop front side connector.
Solution:If you do not want to connect to the
front side Audio connector, Pins 5&6 and 9&10 of Jumper Block JAUD1
have to be shorted OR jumpered. This is required in order to have the
signal output directed from the front to the rear side connector.
Location of Jumper Block JAUD1:It is near PCI Slot 3 in the corner of V7600G Motherboard, near the CD-in (CD1) connector.
Article Contributor : acer Index
14. To increase the internet browsing performance - disable the windows XP default firewall
Open Control Panel and double click on Network Connections. In the new box
that appears right click on the Connection and click on the Advanced tab. Check
or uncheck the box according to your desire.
Article Contributor : Krishna Prasad Acharya
Index